
Monday, August 15, 2011
With a cherry on top!

Wednesday, August 10, 2011
New papers and a "Buggy" Challenge
It's been almost a year since I last competed in a challenge. I was super excited when I got online and checked out the Fantabulous Cricut Challenge Blog to find a challenge I was definitely up for! The challenge was to use my Cricut and "get buggy"! Of course when someone tells me to get "buggy" I have to use butterflies! I pitter pattered up stairs to my craft room to look through my heart cartridges. I found some beautiful butterflies on a cartridge I have never used before! The Cricut Solutions Serenade cartridge contains birdhouse, butterflies, and lots of fun. I had also been itching to use some new papers I bought at Artsy! While there I also purchased some gears and sprockets that I believe are from Tim Holtz. Oh, and I found adorable little tickets with words.
Anyway, with the challenge and my new purchases in mind, I came up with these three cards:
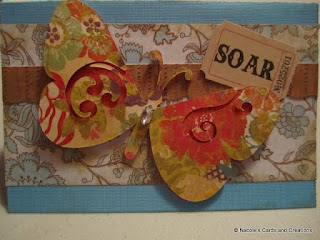


 The paper I got at Artsy is by Crate and so is the border I used. My blue cardstock and light blue accent paper are from DCWV paper stacks that I had purchased almost two years ago. I used a big gem from Jolee's on each butterfly to add a little sparkle. I stapled my words on to add just a little finishing touch. I think these turned out pretty well and I'm so happy to be blogging cards again!
Anyway, with the challenge and my new purchases in mind, I came up with these three cards:


Tuesday, August 9, 2011
Happy "Moo"thers Day

Saturday, July 16, 2011
This cake's for you!
Time to make a birthday card! I used the From My Kitchen Cricut Cartridge to create this slice of cake. I wanted it to look like a slice of German chocolate cake, so chose a lighter brown paper and a chocolate brown for the middle. I used the Sizzix Big Shot to cut out and emboss the white paper in the background that says, "Happy Birthday!" I used a scrap of blue paper with brown little flowers to pick up the chocolate in the cake and the blue in the brightly colored, patterned card stock. I popped the cake up with foam tape to give it some dimension. To tie it all together, I used a sheer ribbon at the top. Ta-da a cute little birthday card!
![]()

Wednesday, July 13, 2011
More fun with Create a Critter

This shape card was inspired by a friend who has an alligator collection. Her birthday was coming up and I knew I wanted to make her a special card. I used my Cricut Create a Critter Cartridge to cut out all of the layers of the alligator and an additional background layer. The additional background layer became the card base to write on. I used foam tape to really make the layers pop! She was amazed at all the layers and just kept looking at the card. I also distressed as much as possible to try to tone down the bright green coloring and make it a little more alligator like. I ran a few of the layers through my Big Shot to add some texture. I moved it from a layered alligator to a card by using the additional back layer and brad. I hid the brad behind one of the ridges on the back. It was a fun little project to put together!

Sunday, July 10, 2011
This card is DinoMite!
I have to admit when I think of purple dinosaurs, I think of Barney. So, I wanted to be really careful with how I designed this loveable dinosaur. Living in Colorado, everyone knows another purple dinosaur...Digger! In case you don't know, Digger is the mascot for the Colorado Rockies. Slightly more masculine than Barney, I decided I could get away with a big purple dinosaur.
![]()
Trying to use up some scrap paper, I chose a purple gingham print for the background. I used foam tape to layer my dinosaur that I cut out from Create a Critter on my Cricut cartridge. I ran one of the layers of the dinosaur through my Big Shot and a Cuddle Bug folder. I like that it gave the skin a little texture! I went around the edges with some ink to distress and added purple stickles to dress up the card. I also used a light green cardstock to mount the dinosaur on, so he didn't just blend in to all the purple paper. On the light green paper, I ran it through the Big Shot with a nesting set I had. That created a natural frame. I think the card turned out really well. I gave it away for Father's Day and wrote, "I hope you have a dino-mite father's day!" Lots of fun and it brought a big smile to the face of a special dad.

Trying to use up some scrap paper, I chose a purple gingham print for the background. I used foam tape to layer my dinosaur that I cut out from Create a Critter on my Cricut cartridge. I ran one of the layers of the dinosaur through my Big Shot and a Cuddle Bug folder. I like that it gave the skin a little texture! I went around the edges with some ink to distress and added purple stickles to dress up the card. I also used a light green cardstock to mount the dinosaur on, so he didn't just blend in to all the purple paper. On the light green paper, I ran it through the Big Shot with a nesting set I had. That created a natural frame. I think the card turned out really well. I gave it away for Father's Day and wrote, "I hope you have a dino-mite father's day!" Lots of fun and it brought a big smile to the face of a special dad.
Saturday, July 9, 2011
Hip Hip Hooray
I have been crazy busy with work and only had small amounts of time to make cards in the past year. I have in those small moments found time to make some fun cards. I also just finished my Master's degree and realized I might have time again in my life to do some of the things I love, like take pictures and make cards! I even spent some time in my craft room cleaning the other day! Anyway, enough with the chit chat, here is a sweet little card I made.
![]() I used my Cricut and the Create a Critter Cartridge to cut out the Hip Hip Hooray and the Hippo. Rather than keep a plain old "o" I added a flower with a teal bling in the middle. I also used foam tape between every single layer of the hippo, which made it really stand out and added some life to this little critter. What I love about this card is that it has endless possibilities! I gave it to my niece for her first birthday and wrote, "Hip, hip hooray it's your first birthday today!" Really, you can hip, hip hooray anything.

Subscribe to:
Posts (Atom)