Showing posts with label Fantabulous Cricut Challenge. Show all posts

Friday, January 4, 2013

Organizing My Thoughts in 2013

On Pinterest I came across  a journal comprised of index cards.  There were 365 cards tucked into a bowl. Each day a person is encouraged to write one sentence about their day. The bowl with index cards was cute and I love the idea of journaling a simple sentence every day.  However, knowing me...I need to have my cards bound together. Plus, I want them to be reflective of me.  I wanted something that screamed, "Nacole made me!"  My sister and I headed over to Walgreens. They had the little Five Star Notebooks on sale, buy one, get one free for $2.87.  I looked at index card books, but they didn't quite have enough cards.  I decided this notebook would be ideal. Here is what I started with, a black little notebook.
This project was perfect because it happened to fit in with the Fantabulous Cricut Challenge Get Organized Crawl! I started by designing the cover. I had some paper that I fell in love with and purchased on a whim a few months ago.  I didn't know at the time what I would use it for, but this project was the perfect use! The paper is from Simple Stories and is part of their Documented line. As I pieced the cover together, I added some ink to distress, a strip of brown rib, a gear to look like a flower, and of course used my Cricut to cut out tabs, letters, and numbers. The tabs are from the Elegant Edges Cartridge and the letters and numbers are from the Plantin Schoolbook Cartridge.  On the letters I did a shadow to match the tabs and topped with the letters I cut out in chocolate.

After the cover was done, I decided to add just a little more to the covers. This is the inside cover!
This is the back cover. See that last tab? It has a hidden surprise!

I added a secret pocket! You know, for those fortunes out of fortune cookies, special photos, clippings, etc. that sum up that year! I tucked a silly little card in to the pocket so you could see it.

This is how the tabs turned out. I staggered the tabs and the numbers.  Finally, I updated the first three days of January.  My biggest challenge? Just writing a single sentence about the day. I am a very verbacious person, so one sentence is a bit tricky. I planned to use a half of each side of the page per day.  I'm glad I did, because I have been filling up my space! 

This was a fun project and I'm so excited to have a fun way to organize my daily thoughts in 2013!

Saturday, May 26, 2012

Hoot Hoot for the Graduates!


This Memorial Day weekend we are celebrating a couple of graduates that we know! This week I decided to make a couple of cards.  One card is for a male graduate and the other is for a female graduate.  I have been able to use more of my scraps lately, because they are all nicely organized by color. Eventually, I may have to post a few pictures of my new craft room, but that will be another post.  For today we will talk about my Hoot Hoot Graduation Cards. To make them I used two different cartridges: Just Because Cards and Everyday Paper Dolls. I cut out the owl from Just Because Cards and the graduation cap and tassle from Everyday Paper Dolls. I used some designer series paper on each card to add a little oomph, some ribbon or twine for texture, and Stickles to make the graduation caps extra special.  I also glossed up the owl's beak and used my Tim Holtz distress pads to give my owls some character.  I think the cards turned out to be a ....hoot! Okay, I couldn't resist that one.  These cards are also being used for the CAS-ual Friday challenge for a masculine card using designer series paper and the Fantabulous Cricut Challenge asking for a "You Did It!" card.  Be sure to click on their links and check out their awesome challenges!

Sunday, May 20, 2012

Hula Time

The weather is warm here in Colorado and all I want to do is go find a spot of sand to wiggle my toes in! Good thing I have a comfortable new craft room, a challenge, and a beach themed cartridge to play with. Fantabulous Cricut's challenge this week was around the theme of dance.  I looked at my cartridges and right away thought of Life's A Beach! I was so excited to see a cute little Hula girl.  I cut her out, added Stickles, Glossy Accents, some pink chalk for cheeks, and popped her up on a pink oval that I distressed with some pink ink.  I thought the lime green floral print made a nice background, so mounted that on a peach cardstock.  Finally, whenever we have visited Hawaii, there are flowers abundant. So, I added a couple bright pink ones to remind me of the tropics!

Saturday, February 4, 2012

Itty Bitty Love


This is a quick 3x3 card, all made on the Cricut for the Fantabulous Cricut Challenge this week. Used Just Because Cards for the base and Create a Critter for the cute heart and sentiment.  Popped each layer up with pop dots and added some Stickles. Used my hearts Cuddle bug folder to add some embossing to the background.  Short and sweet and full of love!

Saturday, December 24, 2011

Odds and Ends with Bags, Tags, and Boxes


This week at work a co-worker pointed out a cute box in a magazine.  We got to talking and I remembered that I had the Bags, Tags, and Boxes Cricut Cartridge. I wanted to see how big of a box I could make sometime during my vacation.  Fast forward a couple days and I needed to wrap a gift card.  I decided to make my own box using the cartridge.  After looking at various boxes, I decided on the crayon box.  I had some heavy green metallic card stock, some green trees I had stamped using Tim Holtz distress inks on water color paper with a few flicks of water, and a piece of ribbon from Bath and Body Works when they gift wrapped something for me last year.  I dug through my scrap drawer and found some red and white scraps of paper.  I cut out my box at 8 3/4 inch.  I used some adhesive to put it together, wrapped the ribbon around the box and framed my stamped image of an evergreen tree.  I popped my tree up with some foam adhesive. I was happy this turned out to be fairly masculine, because the gift card is for a male.
I also knew that at Fantabulous Cricut they issued a challenge to trim with a tag in this week's project.  I used some of the same green cardstock to cut out a tag on my Cricut.  I trimmed the bottom of the tag and rounded the edges with a corner rounder from Stampin' Up! Next, I used some scrap paper and some seasonal Tim Holtz ink to stamp my message on my tag.  I added a little green gem to the corner of the stamped image.  I finished the tag off with my coordinating ribbon. Voila, a gift box and tag!

Saturday, December 17, 2011

Scraptastic Holiday Cards!

I have been feeling the need to bust out my Cricut and make something fantastic.  I have been prepping for card classes and a scrapbook class coming up at Artsy, but haven't spent a ton of time in my own craft room.  I even took a two part 12 Tags of Christmas class - which was so much fun!  Anyway, I decided I needed to break out my own tools and get to work crafting.  I didn't have time to run to the store or even grab some coordinating papers, so focused on using scraps.  Fortunately, I had a couple pieces of paper I had purchased at a crop a few months ago that kind of coordinated.
I started by cutting out a tree using the Create A Critter cartridge, my tree was kind of plain, so I used Perfect Pearls Mists in perfect pewter to add some sparkle.  I continued to cut out strings of lights to piece together, then cut apart to dress up my tree.  I used dark brown distress ink to color the trunk and added a touch of fluffy white snow.
I topped the tree off with an over-sized Jolee's gem.  I didn't have a paper to back my tree with that matched...so I had to make my own.  I created a mosaic with little extra pieces of paper that I had used to cut out the lights for the tree.  I also cut out the word, "joy".  I had to spray this with glimmery mist too! I backed the cards in pink and added my ribbon.

Voila', a fun and bright holiday card!

Monday, August 22, 2011

The Birthday Tri-fold-a


Okay, hope you love seeing birthday cards! This week the challenge at Fantabulous Cricut is Birthday Bash...make a birthday card.  I was also checking around and found the challenge at CAS-ual Fridays promoting embossing! Fortunately, I needed to make a birthday card for my dear Father-in-law who has a birthday in 8 days! One of my on-going issues with cards is to make more cards that are masculine. I am great at ribbons, glitter, bows, and all things feminine.  I had also been itching to make a tri-fold card.  When I looked in my paper stash, I immediately saw lots of black and white.  I decided to accent with red.  The paper I used is all from my scrap bucket or DCWV.  The buttons are from a random assortment I keep on hand sorted by color. I used the Swiss Dots Cuttlebug Folder to emboss my white card stock.  I used my Cricut to cut out the red panels.  The cartridge I chose was Just Because Cards.  I used stamps from Stampin' Up! Birthday Whimsy on the red panels. Finally, I used yellow Stickles on my candle and some rhinestones on my birthday gift...all birthday wrap has some short of shine, doesn't it? I have a picture pre-fold and post-fold for you viewing pleasure. :-)

Sunday, August 21, 2011

Cake please, with a cherry on top!


Fantabulous Cricut's weekly challenge asked for a cupcake or other sweet treat.  This works out perfectly since we have lots of August birthdays in our family.  I knew my Stretch Your Imagination cartridge had a cake card, I played around with that for a little bit before scratching the project and starting over.  I decided I just wanted to make a cake and not do a window card.  I started rifling through my cartridges and came across one I haven't used very much at all.  I decided to give Just Because Cards a shot.  I found a cute little cake, fun card shape, fun border, and went to work cutting.  I had some more recently purchased paper from Artsy that I hadn't been just waiting for the perfect card to make.  I decided this was my chance.  When I got all done cutting out my cake, cherry, card, border, I didn't want to just put my cake on the card.  It needed a pedestal! Fortunately, the From My Kitchen cartridge had a cake on a pedestal.  I measured the size of my cake and cut out a cake on pedestal from the cartridge.  Then, I just snipped off the cake on the pedestal and replaced it with the cake I created.  I wanted some dimension on the card, so popped the border up with foam tape and popped up the cake pedestal and stand.  I still needed a little "oomph" for my card.  I used one of the giant sized jewels from Jolee's (also purchased at Artsy) to bedazzle my pedestal.  Then I used red Stickles on my cherry to give it a roundness that popped off the paper.  Finally, I added a thin grossgrain ribbon to the side.  The bow sort of reminded me of opening a fragile birthday gift with something fancy inside! Anyway, with just hours to spare, this is my card for this week's challenge!

Wednesday, August 10, 2011

New papers and a "Buggy" Challenge

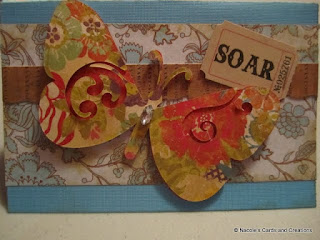
It's been almost a year since I last competed in a challenge.  I was super excited when I got online and checked out the Fantabulous Cricut Challenge Blog to find a challenge I was definitely up for!  The challenge was to use my Cricut and "get buggy"! Of course when someone tells me to get "buggy" I have to use butterflies!  I pitter pattered up stairs to my craft room to look through my heart cartridges.  I found some beautiful butterflies on a cartridge I have never used before! The Cricut Solutions Serenade cartridge contains birdhouse, butterflies, and lots of fun.  I had also been itching to use some new papers I bought at Artsy!  While there I also purchased some gears and sprockets that I believe are from Tim Holtz.  Oh, and I found adorable little tickets with words.
Anyway, with the challenge and my new purchases in mind, I came up with these three cards:


The paper I got at Artsy is by Crate and so is the border I used. My blue cardstock and light blue accent paper are from DCWV paper stacks that I had purchased almost two years ago.  I used a big gem from Jolee's on each butterfly to add a little sparkle.  I stapled my words on to add just a little finishing touch.  I think these turned out pretty well and I'm so happy to be blogging cards again!

Tuesday, July 13, 2010

Cheers to a Challenge!

The Fantabulous Cricut Challenge Blog threw down a "cool yummy treat with optional shape card" challenge this week!  I love all things cool and yummy, I think.  So I debated which treat would be made into a card.  I literally called on the skills I learned back in maybe 2nd grade, the skill of brainstorming.  I sat and wrote down every cool yummy treat I could think of.  On a couple of them I had mini brainstorms underneath. Ultimately, the margarita seemed like the perfect adult cool and yummy treat to drink, er I mean create!  Now came the challenge of finding a margarita glass on my Cricut cartridges.  On the Cuttin' Up cartridge there is a martini glass and font set.  I cleverly used my Design Studio software to mold the martini glass into a funky deco style margarita glass shaped card! The olive that gets cut out along with the "martini" glass had the toothpick cut off and became a lime.  I obviously cut the card on white card stock.  I used a scrapbooking plastic to trace out the "glass".  In between the glass and card is some DCWV green glitter card stock or margarita mix.  The ice cubes I picked up at Archiver's.  They are actually Crystal Stickers Mosaic 10mm in white.  Although, I think they have such a pretty shimmer to them, just like rock candy!  I salted the rim of the glass with Stickles in Star Dust. Since the lime was originally white, I tinted it green with some color box pigment.  I added my lines and used Stickles in Green to make the peel. Since the lime needed a seed, I used a tiny green gem in the center. Just a cut and it slipped right on to the rim of the glass. Now every good host has some way to mark who gets what glass.  I experimented with metal rings and such, but those were too bulky and just sort of threw the delicate card off.  The shimmery sheer ribbon seemed like a perfect fit.  When I entertain I really do wrap stuff up with ribbon.  For example, I think napkins with the necessary utensils rolled up inside look so cute in a basket with matching ribbon on the handle and ribbon around the utensil roll!  So, at my house it is not one bit odd that I might have bits of ribbon tied around the bottom of a margarita or wine glass to mark who gets which glass! Finally, what cool yummy treat with alcohol doesn't have an umbrella?! I just had to slip it in between the layer of card stock and my margarita mix.  There you have it, a calorie free, alcohol free, cool, yummy, summer treat. Cheers!

Friday, July 9, 2010

Buzzing Around the Fantabulous Cricut Challenge


Fantabulous Cricut has a challenge every Monday. This week's challenge was to make a project using any type of bug and the color orange somewhere in your project. Of course it needs to have something from your Cricut in the project. I decided to make a card. I used the Walk in My Garden cartridge and my Design Studio software to create a bumble bee card. I cut the card out in orange cardstock and the accents in black cardstock. I used black, orange, and clear Stickles to highlight the edges and wings. I used a soft pink gel pen to draw on a little smile, after all, the card says, "Be Happy". I used a couple of googly eyes to really bring the bee to life. Finally, I added some texture with a girly bow made out of a sheer ribbon. This card is buzzing with charm!