Saturday, December 24, 2011

Odds and Ends with Bags, Tags, and Boxes


This week at work a co-worker pointed out a cute box in a magazine.  We got to talking and I remembered that I had the Bags, Tags, and Boxes Cricut Cartridge. I wanted to see how big of a box I could make sometime during my vacation.  Fast forward a couple days and I needed to wrap a gift card.  I decided to make my own box using the cartridge.  After looking at various boxes, I decided on the crayon box.  I had some heavy green metallic card stock, some green trees I had stamped using Tim Holtz distress inks on water color paper with a few flicks of water, and a piece of ribbon from Bath and Body Works when they gift wrapped something for me last year.  I dug through my scrap drawer and found some red and white scraps of paper.  I cut out my box at 8 3/4 inch.  I used some adhesive to put it together, wrapped the ribbon around the box and framed my stamped image of an evergreen tree.  I popped my tree up with some foam adhesive. I was happy this turned out to be fairly masculine, because the gift card is for a male.
I also knew that at Fantabulous Cricut they issued a challenge to trim with a tag in this week's project.  I used some of the same green cardstock to cut out a tag on my Cricut.  I trimmed the bottom of the tag and rounded the edges with a corner rounder from Stampin' Up! Next, I used some scrap paper and some seasonal Tim Holtz ink to stamp my message on my tag.  I added a little green gem to the corner of the stamped image.  I finished the tag off with my coordinating ribbon. Voila, a gift box and tag!

Saturday, December 17, 2011

Scraptastic Holiday Cards!

I have been feeling the need to bust out my Cricut and make something fantastic.  I have been prepping for card classes and a scrapbook class coming up at Artsy, but haven't spent a ton of time in my own craft room.  I even took a two part 12 Tags of Christmas class - which was so much fun!  Anyway, I decided I needed to break out my own tools and get to work crafting.  I didn't have time to run to the store or even grab some coordinating papers, so focused on using scraps.  Fortunately, I had a couple pieces of paper I had purchased at a crop a few months ago that kind of coordinated.
I started by cutting out a tree using the Create A Critter cartridge, my tree was kind of plain, so I used Perfect Pearls Mists in perfect pewter to add some sparkle.  I continued to cut out strings of lights to piece together, then cut apart to dress up my tree.  I used dark brown distress ink to color the trunk and added a touch of fluffy white snow.
I topped the tree off with an over-sized Jolee's gem.  I didn't have a paper to back my tree with that matched...so I had to make my own.  I created a mosaic with little extra pieces of paper that I had used to cut out the lights for the tree.  I also cut out the word, "joy".  I had to spray this with glimmery mist too! I backed the cards in pink and added my ribbon.

Voila', a fun and bright holiday card!

Monday, November 28, 2011

Happy Holidays

Here are two of my holiday cards I created!  I am teaching a class on these tomorrow evening at Artsy.  I love the tri-fold shutter card, because it folds up cute and displays so nicely.  I also like that you can add a photo in on a panel, designer paper, buttons, twine, etc.  The options are endless!

Sunday, November 20, 2011

Give Thanks


I bought some fun BoBunny paper at Artsy and whipped up this fun little wall hanging.  I simply cut around various leaves and patterns, stacked em up, and used foam adhesive to attach.  I cut out the Give Thanks part on my Cricut using the Cindi Loo cartridge. I loved that the word "Thanks" was already together.  To finish off the whole piece, I added some Stickles in Diamond to the dragonfly and a sheer brown ribbon tied with a bow.  Quick, cute, fun, and festive!  Works out great for this week's challenge on Fantabulous Cricut where we are sharing our blessings using the colors red, brown, and orange.

Monday, October 31, 2011

A different kind of card and creation

I'm proud to announce that this evening I published a new card creation. Okay, so it's not exactly like the cards I create and have posted so far.  This is actually a set of playing cards and brand new game that will entertain you for hours!  That's right, I published a new game called Twenty Six. It's a word game mixed with poker to create something incredibly fun! I started working on the game design just a couple of months ago.  My husband listened really well to my vision for the cards. I wanted cards that were distressed on the edges with stamp like flourishes and a typewriter font.  The cards are almost Tim Holtz-esque.  If you love to play games or enjoy playing with words, you will really like my game.  Fortunately, it's available for holiday gift giving!  Purchase a copy to play with your loved ones over the holidays and let me know what you think!  Hope you like playing the game, just as much as I liked designing it!

Thursday, October 6, 2011

Card Classes in Colorado!

Guess what...you can see a sneak peek of my card class I am teaching this Saturday from 2-4pm at Artsy! Click here to see one of two butterfly cards we will be creating together, then call to reserve your seat!

Sunday, September 4, 2011

Hey Chickee

Chick, chick, chickee!  Okay, it's another Create A Critter Cartridge, but I love, love, love these animals!  I am always hesitant to use patterns together, but wanted something that really sprung to life with color.  So, I did something outrageous (by my standards) and used double floral print patterns!  I did a solid ribbon ad solid frames to make the card less chaotic.  I used foam adhesive square to bump up the chick and the square the chick is mounted on.  These are great Easter cards or great "Hey Chickee!" cards!

Monday, August 29, 2011

Taylored Expressions: 3rd Birthday Bash

Happy Birthday to Taylored Expressions! Jump over by clicking here: Taylored Expressions: Taylored Expressions September Sneaks - Day 1. They are having a virtual party this week and announcing some new arrivals! Tons of fun!

Saturday, August 27, 2011

Bee Mine


I made Valentine's Day cards using my beloved Create A Critter cartridge.  What's not to love about the adorable, happy, little critters on this cartridge?  I used a heart print paper to back my card.  Then I cut out a heart frame in red and base heart in white.  I ran them through an embossing folder to add even more hearts before using foam adhesive to bump it up!  Finally, I topped it all off with my sweet bumble bee and some bedazzled antennae. 

Monday, August 22, 2011

The Birthday Tri-fold-a


Okay, hope you love seeing birthday cards! This week the challenge at Fantabulous Cricut is Birthday Bash...make a birthday card.  I was also checking around and found the challenge at CAS-ual Fridays promoting embossing! Fortunately, I needed to make a birthday card for my dear Father-in-law who has a birthday in 8 days! One of my on-going issues with cards is to make more cards that are masculine. I am great at ribbons, glitter, bows, and all things feminine.  I had also been itching to make a tri-fold card.  When I looked in my paper stash, I immediately saw lots of black and white.  I decided to accent with red.  The paper I used is all from my scrap bucket or DCWV.  The buttons are from a random assortment I keep on hand sorted by color. I used the Swiss Dots Cuttlebug Folder to emboss my white card stock.  I used my Cricut to cut out the red panels.  The cartridge I chose was Just Because Cards.  I used stamps from Stampin' Up! Birthday Whimsy on the red panels. Finally, I used yellow Stickles on my candle and some rhinestones on my birthday gift...all birthday wrap has some short of shine, doesn't it? I have a picture pre-fold and post-fold for you viewing pleasure. :-)

Sunday, August 21, 2011

Cake please, with a cherry on top!


Fantabulous Cricut's weekly challenge asked for a cupcake or other sweet treat.  This works out perfectly since we have lots of August birthdays in our family.  I knew my Stretch Your Imagination cartridge had a cake card, I played around with that for a little bit before scratching the project and starting over.  I decided I just wanted to make a cake and not do a window card.  I started rifling through my cartridges and came across one I haven't used very much at all.  I decided to give Just Because Cards a shot.  I found a cute little cake, fun card shape, fun border, and went to work cutting.  I had some more recently purchased paper from Artsy that I hadn't been just waiting for the perfect card to make.  I decided this was my chance.  When I got all done cutting out my cake, cherry, card, border, I didn't want to just put my cake on the card.  It needed a pedestal! Fortunately, the From My Kitchen cartridge had a cake on a pedestal.  I measured the size of my cake and cut out a cake on pedestal from the cartridge.  Then, I just snipped off the cake on the pedestal and replaced it with the cake I created.  I wanted some dimension on the card, so popped the border up with foam tape and popped up the cake pedestal and stand.  I still needed a little "oomph" for my card.  I used one of the giant sized jewels from Jolee's (also purchased at Artsy) to bedazzle my pedestal.  Then I used red Stickles on my cherry to give it a roundness that popped off the paper.  Finally, I added a thin grossgrain ribbon to the side.  The bow sort of reminded me of opening a fragile birthday gift with something fancy inside! Anyway, with just hours to spare, this is my card for this week's challenge!

Flutterby, Flutterby, Flutterby

I love butterflies!  They are my favorite animal...which a lot of people debate, but let it be known that I love these critters.  They also happen to be my mom's favorite!  I made her this card and she loved it! I embossed the white card stock, cut out my butterflies from Create A Critter in various sizes and bedazzled the butterflies with some gems!  I kept it very simple so the colors would really pop! 

Monday, August 15, 2011

With a cherry on top!

I am always trying to figure out how to make cards that are more gender neutral.  I came up with this card that is suitable for a male or female.  I used a darker blue cardstock and accented it with a distressed printed paper that I ran through an embossing folder.  I mounted the cup cake that I cut out on the From My Kitchen cartridge over a solid white ribbon.  I accented the cherry with some red and green Stickles to make it extra luscious! 

Wednesday, August 10, 2011

New papers and a "Buggy" Challenge

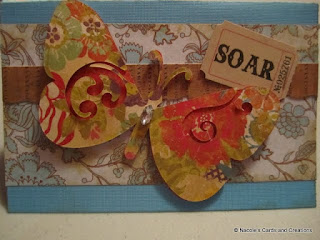
It's been almost a year since I last competed in a challenge.  I was super excited when I got online and checked out the Fantabulous Cricut Challenge Blog to find a challenge I was definitely up for!  The challenge was to use my Cricut and "get buggy"! Of course when someone tells me to get "buggy" I have to use butterflies!  I pitter pattered up stairs to my craft room to look through my heart cartridges.  I found some beautiful butterflies on a cartridge I have never used before! The Cricut Solutions Serenade cartridge contains birdhouse, butterflies, and lots of fun.  I had also been itching to use some new papers I bought at Artsy!  While there I also purchased some gears and sprockets that I believe are from Tim Holtz.  Oh, and I found adorable little tickets with words.
Anyway, with the challenge and my new purchases in mind, I came up with these three cards:


The paper I got at Artsy is by Crate and so is the border I used. My blue cardstock and light blue accent paper are from DCWV paper stacks that I had purchased almost two years ago.  I used a big gem from Jolee's on each butterfly to add a little sparkle.  I stapled my words on to add just a little finishing touch.  I think these turned out pretty well and I'm so happy to be blogging cards again!

Tuesday, August 9, 2011

Happy "Moo"thers Day

This is the card I made for my Mother-in-Law for Mother's Day.  She has a collection of cows in her kitchen and I couldn't resist adding to her collection by using the Create A Critter cartridge!  I also cut out a large barn twice and attached the two pieces with a brad at the top.  I love adding googly eyes to my animals to bring them to life.  My cow is very sweet and benefited from a sheer ribbon bow and paper flowers on either side.  I wanted the barn to look aged, so I distressed it with dark red ink and a charcoal ink.  Of course on the inside I wrote, "Happy Moothers Day!"

Saturday, July 16, 2011

This cake's for you!

Time to make a birthday card!  I used the From My Kitchen Cricut Cartridge to create this slice of cake.  I wanted it to look like a slice of German chocolate cake, so chose a lighter brown paper and a chocolate brown for the middle.  I used the Sizzix Big Shot to cut out and emboss the white paper in the background that says, "Happy Birthday!" I used a scrap of blue paper with brown little flowers to pick up the chocolate in the cake and the blue in the brightly colored, patterned card stock.  I popped the cake up with foam tape to give it some dimension.  To tie it all together, I used a sheer ribbon at the top. Ta-da a cute little birthday card!

Wednesday, July 13, 2011

More fun with Create a Critter


This shape card was inspired by a friend who has an alligator collection.  Her birthday was coming up and I knew I wanted to make her a special card.  I used my Cricut Create a Critter Cartridge to cut out all of the layers of the alligator and an additional background layer.  The additional background layer became the card base to write on.  I used foam tape to really make the layers pop! She was amazed at all the layers and just kept looking at the card.  I also distressed as much as possible to try to tone down the bright green coloring and make it a little more alligator like. I ran a few of the layers through my Big Shot to add some texture.  I moved it from a layered alligator to a card by using the additional back layer and brad.  I hid the brad behind one of the ridges on the back. It was a fun little project to put together!

Sunday, July 10, 2011

This card is DinoMite!

I have to admit when I think of purple dinosaurs, I think of Barney.  So, I wanted to be really careful with how I designed this loveable dinosaur.  Living in Colorado, everyone knows another purple dinosaur...Digger! In case you don't know, Digger is the mascot for the Colorado Rockies.  Slightly more masculine than Barney, I decided I could get away with a big purple dinosaur. 


Trying to use up some scrap paper, I chose a purple gingham print for the background. I used foam tape to layer my dinosaur that I cut out from Create a Critter on my Cricut cartridge. I ran one of the layers of the dinosaur through my Big Shot and a Cuddle Bug folder. I like that it gave the skin a little texture! I went around the edges with some ink to distress and added purple stickles to dress up the card.  I also used a light green cardstock to mount the dinosaur on, so he didn't just blend in to all the purple paper.  On the light green paper, I ran it through the Big Shot with a nesting set I had.  That created a natural frame.  I think the card turned out really well.  I gave it away for Father's Day and wrote, "I hope you have a dino-mite father's day!"  Lots of fun and it brought a big smile to the face of a special dad.

Saturday, July 9, 2011

Hip Hip Hooray

I have been crazy busy with work and only had small amounts of time to make cards in the past year.  I have in those small moments found time to make some fun cards. I also just finished my Master's degree and realized I might have time again in my life to do some of the things I love, like take pictures and make cards!  I even spent some time in my craft room cleaning the other day! Anyway, enough with the chit chat, here is a sweet little card I made.

I used my Cricut and the Create a Critter Cartridge to cut out the Hip Hip Hooray and the Hippo.  Rather than keep a plain old "o" I added a flower with a teal bling in the middle.  I also used foam tape between every single layer of the hippo, which made it really stand out and added some life to this little critter.  What I love about this card is that it has endless possibilities! I gave it to my niece for her first birthday and wrote, "Hip, hip hooray it's your first birthday today!"  Really, you can hip, hip hooray anything.